Faema Velox 1962

Hi all

 Very difficult to post since a while, but work continues. Here are some new of the Velox. Body came back from chrome, beautiful, a great job, forgotten the anxiety of unpacking, no longer any trace.

 A friend sent me a second incomplete machine to retrieve the last pieces that were damaged, the water inlet valve and the body of the safety valve.

I still wait a few joints but the preparation of the various parts of the machine is complete, the end of the restoration should now move quite quickly.

 Pascal


Crashed Faema Velox restored

Stainless steel spring on Velox group Groupe Faema Velox Faema Velox boiler Faema Velox group

Yesterday was a good day…

Hello

For a while now I’m looking for a solution to repair the body of the Velox. But it is really not easy to find someone to straighten  sheet metal, nowadays nobody knows how anymore. I would have to look at vintage car restorers, but I have no time search. So I decided that once again I’ll manage by myself. After all, often it is fear of failure that hinders initiative. Fear does not take away danger so let’s go!

On this picture we see various problems, there are these wide curves like waves. And there is this fold just above the water inlet valve on the right. Curves taken by the sheet at the moment of impact will be very simple to fix. Clamps, wooden blocks, anything that comes to hand and will perform the necessary effort to restore its original shape. It only took about thirty minutes, it was impressive but finally was nothing. The real challenge will start immediately after. The small fold in the corner and various small defects in material will be much more complicated to fix. It is brass that will have re chrome, so impossible to use putty as  you might do on a painted surface.


Redressage de tôle laiton sur Faema Velox Fixing dents on Faema Velox

One can’t see really well on pictures but the defect in angle is still important. Really not easy to restore its original shape to this fold. I modified a little tool I shaped into rounded at its end. Then gradually hitting from inside I got to remove quite all traces.


First try to fill the remaining impacts by welding. This is not a good solution because the metal works hard due to high temp and finally it tends to exacerbate the problem.


Finally I removed almost everything. Second try, this time with solder. Plumber’s tin, it melts at a lower temperature. This is more efficient but it is still not ideal.


Finally there won’t be no quick fix, it will take time but it will be better I think, gradually completely fix all remaining small defects. Pushing from the rear bodywork with a hammer while resting on a flat and hard surface. That’s all for now. To follow after Christmas days. For now this view of the Velox enjoy me better than what I found opening the package the first time.

Wish you all merry Christmas days, and great year’s end.

Pascal


Pascal

La Tarvisium Minibar Vindobona

Hello

The most difficult with this little beauty was to find his name.

His owner knew it :

“La Tarvisium”

La Tarvisium logo

Once you know what to look for it is easier to find information. And even if the internet is not very verbose on this machine I will not repeat the history of  brand Tarvisium became Elektra. I leave care to do to historians collectors, my thing to me is rather the technical side of the object. I’ll place some links of the result of my research at the end of article.

Crema caffé

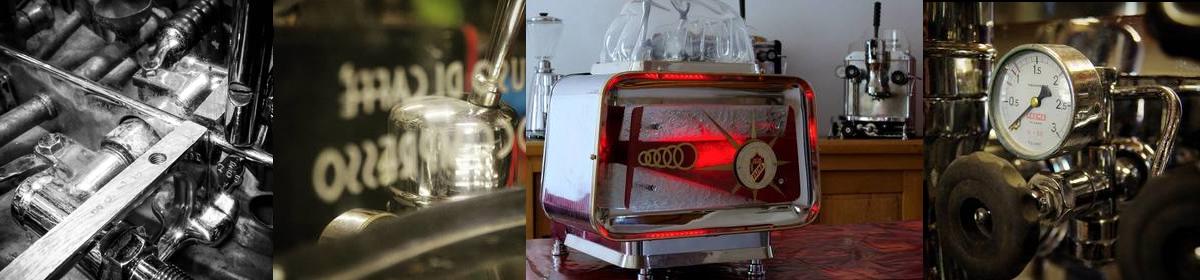
Machine with lever and spring, we have to do with an espresso machine which deserves the name “Caffé Crema”

The marble plate is an integral part of the machine, it carries the whole around three screws. A screw into the front portion by the bottom of the drip tray, and the other two hold the two rear legs. Suffice to say that this machine is to handle with a certain softness. The front panel is sandwiched by the boiler and group. It is connected to the rear body by 6 screws.

Horizontal boiler of a good capacity, I’d say about 1.5 liters. The group, level, steam wand and the manometer are directly on the front face thereof. The heating element is horizontally placed on a copper plate. This one is maintained by a steel flange beautifully crafted. The heater is controlled by an adjustable pressure-stat whom contact should be easily replaced without any other change. I did not all removed because the machine is not mine, borrowed from a friend for our pleasure, but I feel that everything can be replaced for cheaper.

A question is always about these lever machines, the piston size and so the size of the gaskets for when will have to replace them. Three photos to give an idea. On one I put a cap from a wine bottle. And other situations with a Faema’s piston gasket to compare.

Finally, as to give an idea of the size I take some pictures with Arrarex Caravel.

A real pleasure to discover this machine, I still thank its owner for this loan.


Pascal


La Tarvisium crema caffé La Tarvisium spring piston group La Tarvisium boiler La Tarvisium rear La Tarvisium manometer La Tarvisium La Tarvisium heat element La Tarvisium boiler La Tarvisium p-stat La Tarvisium piston's size La Tarvisium piston size La Tarvisium piston size vs faema piston gasket size La Tarvisium vs Caravel Arrarex La Tarvisium vs Caravel Arrarex La Tarvisium group La Tarvisium La Tarvisium La Tarvisium

Différents liens :

Sur le forum Américain Home Barista

Sur un autre forum, Coffeegeek


Faema Mercurio 1953


Hello

Here is a restoration which is nearing its end, a really great machine that Mercurio.

Faema Mercurio by Chromesdantan

I placed the pressostat under the drip tray order to set the heating without opening the machine.

Boiler and electrical detail of Faema Mercurio

Boiler and electrical detail of Faema Mercurio Boiler and electrical detail of Faema Mercurio


Electrical wiring and approved safety valve.

Boiler and electrical detail of Faema Mercurio Boiler and electrical detail of Faema Mercurio


Mounting of the v seal of the piston rod, and piston seals.

On this group the water inlet holes are placed above the seal when piston is down, and below the lower seal when the piston is up. Not thought to take more pictures but some holes too are drilled at the bottom of the piston for the bottom joint. And also at the top to improve passage of water under pressure inside of the lip and pushing it on the group’s shirt. After the photo I finally decided to put a w seal at the top, this way there is two lips oriented to the descent of the piston and I hope it is better for durability.


Piston rod seal Faema Mercurio Piston seals on Marte and Mercurio group


 All the pictures of this post are of a friend. Arstistic vision of my work and the machine.

Thank you Fred


Faema Mercurio by Chromesdantan Faema Mercurio Marte Group on Faema Mercurio Front of Faema Mercurio


Boiler and elecrical detail of Faema Mercurio Faema Mercurio Faema Mercurio Faema Mercurio Faema Mercurio Faema Mercurio


Faema Mercurio 1st generation

Hello

Today I resumed work on the Mercurio. The discharge tube was desoldered, I resoldered and repainted.

Faema mercurio Faema mercurio Faema mercurio Faema mercurio evacuation bassinelle


I’ve often noticed that nobody said anything about “radiator” connections which connect the water inlet and hot water taps. I suspect many do not care about their condition. I wanted to know how it was done so I dismounted and do not regret, they were very rusted. Can not find this type of connection in brass or stainless steel 3/4 female 3/8male so it will be home made. A 1/2m 3/4f fittings and joints to weld 3/8, sawing drilling soldering and voila 😉

Faema mercurio rebuild hot water connector on a faema mercurio Faema mercurio raccord entré eau bas Faema mercurio raccord eau chaude bas


Some cleaning also

Faema mercurio Faema mercurio

Pascal